Model by R+E - VisuArq   //   Render by Justin Slick, Cadalog Inc.

  Tutorial - Pool and patio at Dusk

In this tutorial we will use an HDRI background in combination with light-emitting materials (LEM) and artificial lights to render an indoor-outdoor poolside scene at sunset. This image was created with ProWalker GPU, but the techniques are equally applicable in SU Podium.

This tutorial is broken into several sections:

  1. Process breakdown/overview
  2. Model download and setup
  3. Materials
  4. Artificial lighting
  5. HDRI lighting
  6. Post processing
  7. Simple animation

1. Quick Breakdown/Overview

Before we move into a more detailed step-by-step, this short video breaks down the production process and illustrates how each step contributes to the final result.

As you can see, there's nothing difficult or unusual about the production of this image. Image based lighting with an HDR background gives us all the natural light we need, and artificial lighting is a simple trial and error process as we balance the three light sources and find a balance that looks good.

2. Model and setup

The primary goal of this tutorial is to demonstrate some practical techniques for balancing the exterior light from an HDRI background with interior light fixtures when art-directing an image toward a late evening or early morning atmosphere. This sort of indoor-outdoor lighting near sunset and dawn is seen very frequently in architectural visualization and creates a warm, inviting scene with impressive visual impact.

This model was created and distributed for demo purposes by R+E - VisuArq. We made some slight modifications to the patio layout, but changed very little about the original structure.

The first thing I did was find an appealing composition. I wanted to see sky, interior, and exterior in relatively equal measure, and wanted the room directly in front of the camera to be a high-contrast focal point. If you want to precisely follow the image above, use the scene labeled Starting Cam in the provided .SKP file. All the interior furnishings and artificial lights are on separate SketchUp layers, which can be turned on and off as you choose.

Here is our starting point — at this stage the model is mostly unfurnished, but all the major surfaces are already textured. None of the textures have Podium/ProWalker material properties on them yet, but we will deal with this later.

The base model already contained a very nice pool table, high quality curtains on the rear windows, a TV and console, vase of tulips, and two chandeliers that we decided to keep in the image.

Finishing off the rest of the furnishing was very simple — all the rest of the models were added from Podium Browser, and we used pre-made furniture assemblies to make the process even easier. Here's what we used:

Crimson Spire oak

Dining assembly 48

Modern Agave Plant

Outdoor Assembly 01

Zuo Modern Light

Styrax Japonica

Reggiana Mood

Living assembly 48

Since the model was already textured we didn't need to search for materials, but of course Podium Browser contains similar options if we had needed them:

These Podium Browser materials easily could have been subbed in for the pool deck, tiles, interior flooring, grass, and stone wall.

3. Assigning Podium material properties to our textures

We still need to assign material properties to any of the textures that were present in the model before we started working with Podium Browser — if you don't already have an intuitive feel for how Podium materials are setup, the easiest way to learn is to look at comparable Podium Browser materials and simply copy the values to your own custom materials.

Here's how we configured the materials for this image:

1. Pool deck

I wanted a very slight, virtually unnoticeable blurred reflection on the pool deck. The only place it is really visible in the final image is toward the back of the deck where the brightest interior lights are reflected.

The bump value helps emphasize the space between planks.

2. Interior wood floors

The idea here is the same — subtle blurred reflection, but slightly stronger than the pool deck so that furniture reflections are faintly visible. I increased the reflection to 10, and dropped the bump value down to 1.

Unchecking the blurred reflection option would result in a glossier, polished wood finish is this is what you desire.

Card image cap
Curtains

For the curatins we add a bit of transparency and turn on blurred transparency (translucency). No bump.

Diffuse - 88
Reflection - 0
Transparency - 12
Blurred transparency - On

Card image cap
Stone wall

A very simple material; the only Podium property we applied is 7 bump. No reflection.

Diffuse - 100
Reflection - 0
Transparency - 0
Bump - 7

Card image cap
Glass pane in door

All we did was re-balance the DRT values so that the glass reflects the environment while maintaining transparency. I also put 8% reflection on the black door frame.

Diffuse - 3
Transparency - 85
Reflection - 12

Card image cap
Water material

The exremely still, glassy looking water was a deliberate decision. I wanted to emphasize the reflection of the sky, so I didn't use any ripple texture on the water surface. While a very subtle ripple pattern might be more realistic, I think this remains believable for a small pool on a windless night and helps emphasize the calm, serene mood of the image.

Although the material is only 5% diffuse, I gave it a blue-green surface color (HSB values pictured above). However, most of the color you see actually comes from the underwater lights, which is discussed below.

That's about it for materials! Our job is made significantly easier by using Podium Browser components for the rest of the furnishings, as they are all pre-confiured with Podium material properties.

4. Setting up artificial lighting for the twilight scene

There are three sources of artificial lighting this scene — the overhead lights in the near interior room, the underwater pool lighting, and three "invisible" light emitting materials casting light into the far room. Balancing the three artificial light sources with the natural light from the HDRI is simply a matter of trial and error — I eventually settled on the following settings:

1. Overhead recessed lighting - LEM power 30

The simplest option here was to assign a light emitting material to the square faces on each of the recessed light fixtures. Since all the fixtures already shared a material, this is as easy as color picking the middle face and assigning a light power in the Podium materials dialog. Make sure the material is actually painted on the SketchUp surface not the SketchUp component.

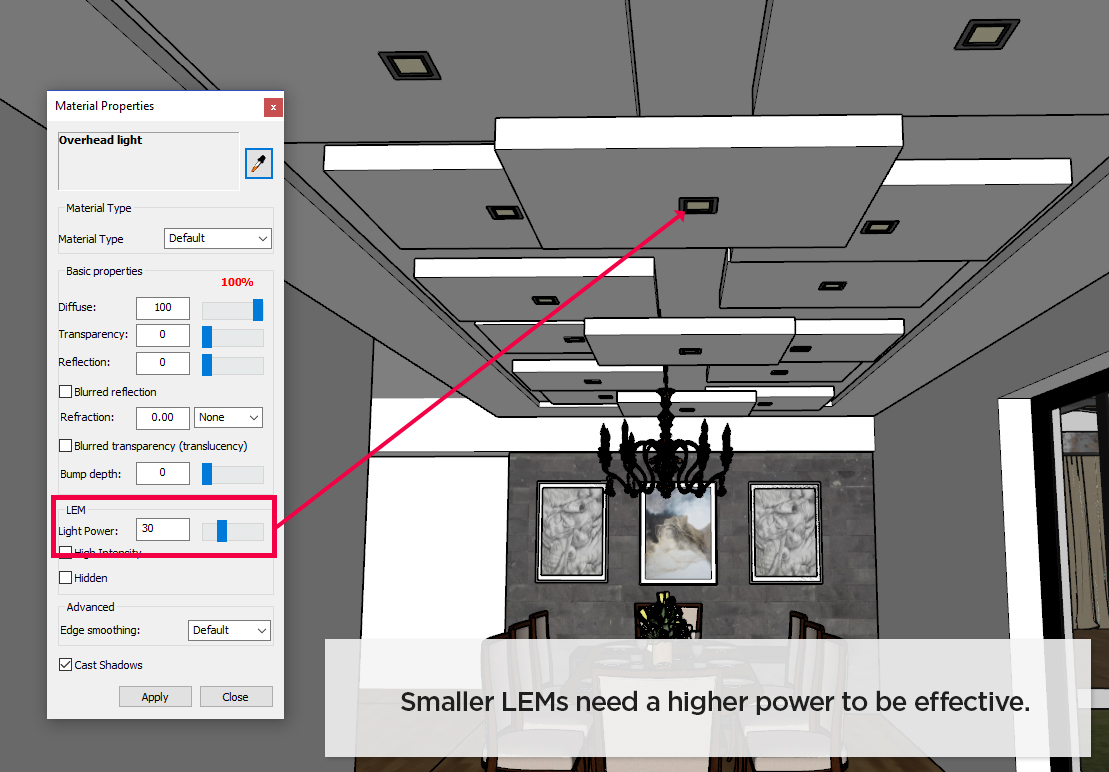
Smaller LEM faces emit less light and often need to be more powerful to fully illuminate a room. These were bumped all the way up to 30 — contrast this to the "off camera" light panels below, which only used a light power of 2, but were much larger surfaces.

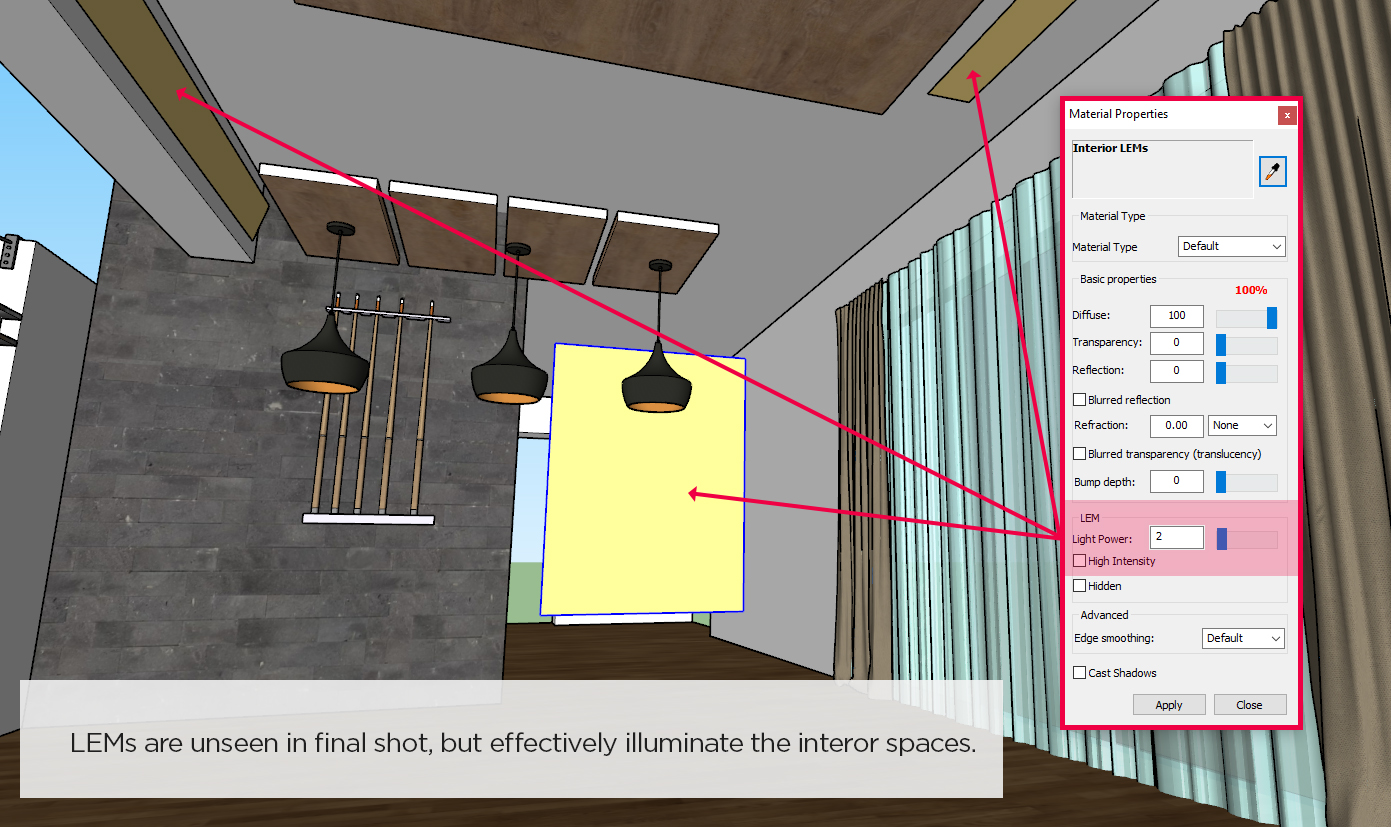
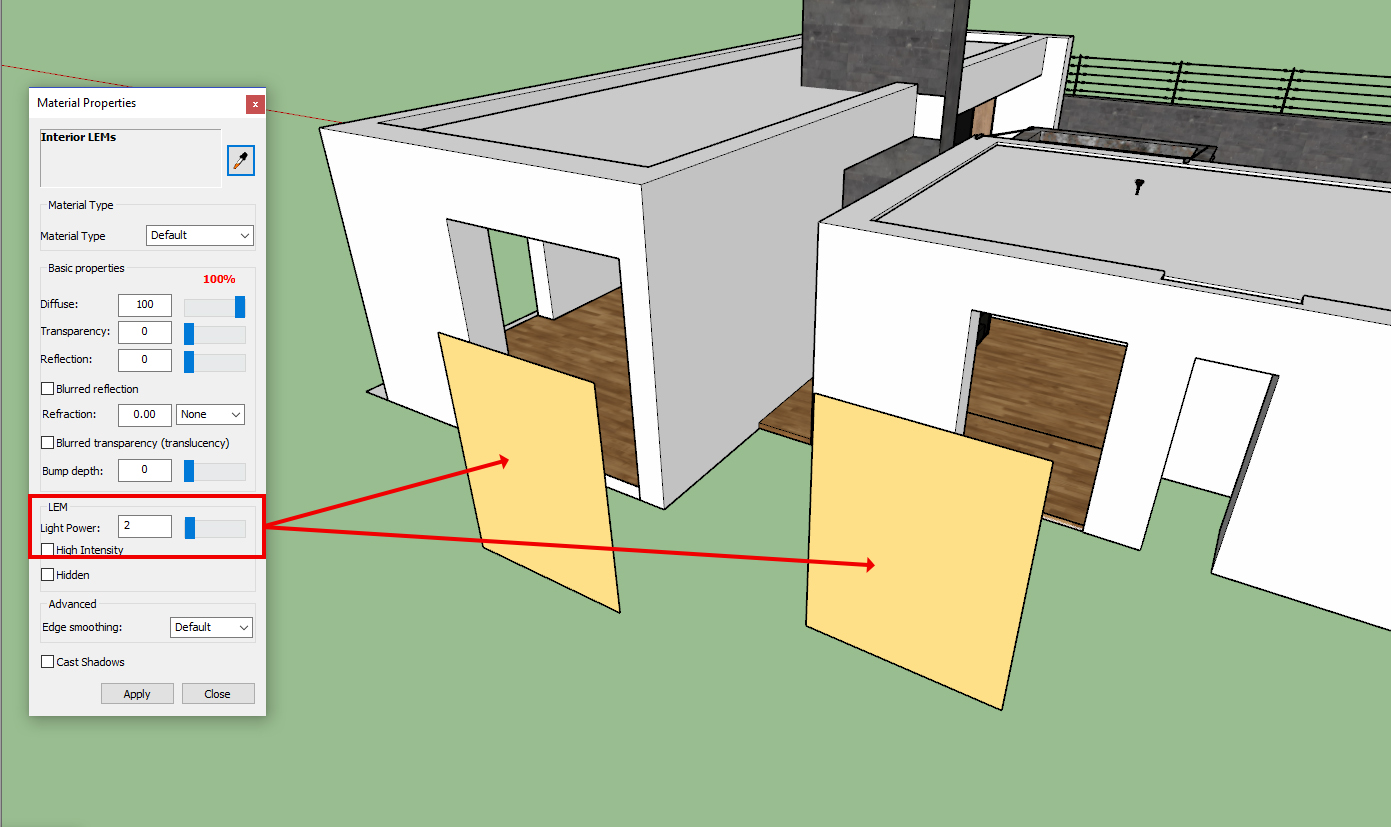
2. Off-camera LEM panels - LEM power 2

I used several large light emitting surfaces to illuminate the interior rooms furthest from the camera. This is a somewhat stylized choice — much like a Photographer using softboxes to highlight and accentuate certain silhouettes. While it would technically be more "true to life" to rely on the chandeliers and suspended light fixtures, I thought this technique produced a more appealing image and fit the desired look that I had in mind.

Click to enlarge

Click to enlarge

Note that the LEM surfaces in this case only use a light power of 2. As mentioned earlier, larger surfaces emit more light and do not need to be set as high. This was the final contribution of the LEM surfaces, seen without any other light in the model:
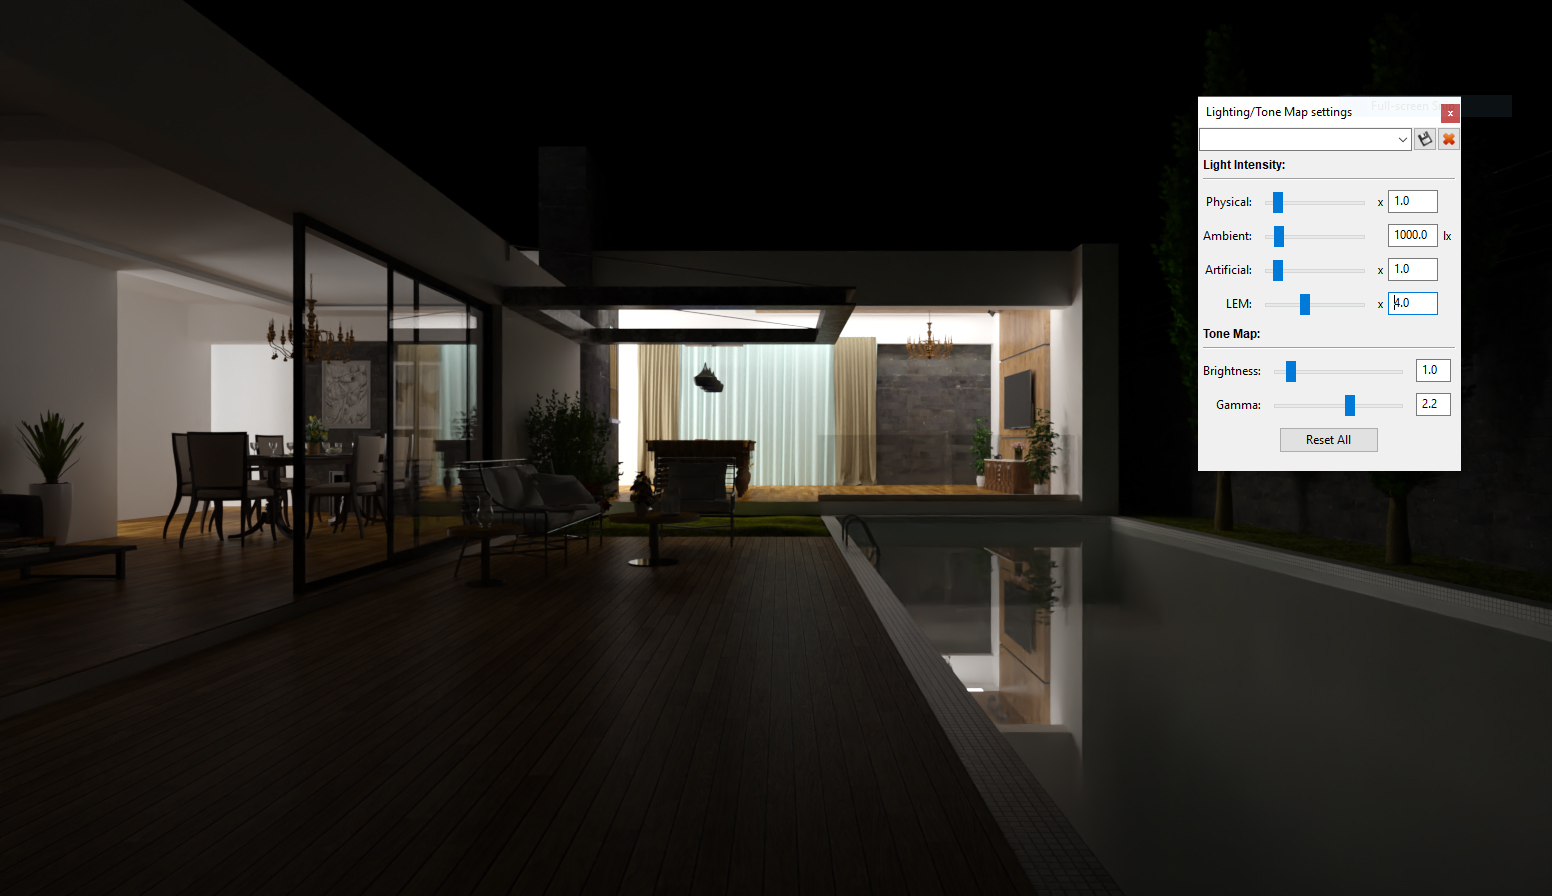
3. Pool lighting

The pool is lit by a row of point lights, tinted blue. Originally these were set inside a Podium Browser light fixture, however I pulled them out from the wall by about two feet because I didn't like the original shadow pattern.

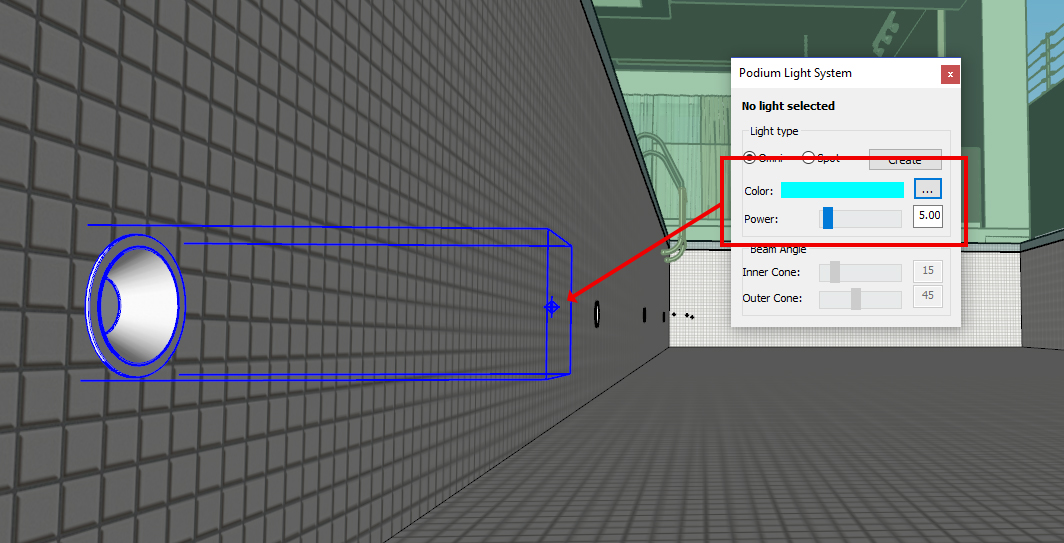
By moving them toward the center of the pool there are fewer hard-edged shadows in the final render, and the final result is more of a soft blue-green ambiance radiating from the pool.

5. Lighting with an HDRI background

For natural light, I chose to use an HDRI background. Image based lighting is activated by selecting the "texture" option in the backgrounds tab. At this stage I'm just trying different backgrounds and adjusting the lighting slider until I arrive at an image I like. I knew I wanted the image to have a late evening or sunset feel, so I installed a few additional HDRIs from Podium Browser. I also tested two from HDRI skies.

These were a few possibilities I liked enough to render out to relatively high sample counts — lighting settings are overlaid for most (click to enlarge).

Afternoon 02

Afternoon 02

Bkg: Sunset 02

Syferfontein from HDRI Haven

Kiera Dawn from HDRI Haven

Sunrise 01 from Podium Browser

The bottom right image is the one I ended up using for the final. I liked the lighting of all three images in the bottom row, but ultimately wanted to see some cloud detail in the sky.

Tip — The bottom-left and bottom-center images were rendered with third party HDRI backgrounds from HDR Haven. Both were initially much brighter than expected, but turning the physical sky power down to 0.1 and 0.2 produced very nice results.

6. Before and after post processing

Approaches to post processing can vary widely from person to person. My own workflow is very incremental and layer based, usually starting with a general levels adjustment and then a first-pass color correction. From there I usually just react to what I have already done and make local contrast and color adjustments based on what I perceive the image needs to be successful or fit a certain mood.

The following breakdown shows the process I followed from raw render to finished image, and which adjustments I made at each step.

I used Photoshop for post processing, but the same basic adjustments could also be completed with Podium Image Editor . Unlike Podium, ProWalker doesn't have an automatic link with Podium Image Editor, but you open can PIE manually from the extensions menu. Extensions > SU Podium V2.5 > Tools > Image Editor.

Tip - When you've reached a stopping point, try to view the finished image on multiple screens if possible to make sure the brightness and saturation of your image looks good on different diaplay types. Phones are often more saturated than laptop displays, for example. You can't account for every monitor, but it doesn't hurt to check the ones available to you.

7. Setting up a simple animation

To finish off the project I rendered a short animation with the camera slowly flying through the scene:

To set-up this simple animation, all we need to do is create a SketchUp scene for the camera's starting and ending position, and then import them into ProWalker.

The following three minute breakdown shows how to configure and render the above animatiion:

Render time - The number of artificial light sources make this a relatively slow scene to render. I set the termination criteria at three minutes per frame, which yeilds a render time of about 8.5 hours for a 7 second video.


That's it — thanks for reading!

We hope this breakdown was helpful to you and provides some insight about how to approach an early morning, evening, or night render with balanced lighting from both the sky and interior. If you have any questions please let us know — and if you follow along and create something awesome we'd love to see it in the gallery forum!