Podium Walker User Interface
The top menu:
Podium Walker has a relatively simple interface (pictured below). Let’s go through the functions one by one:
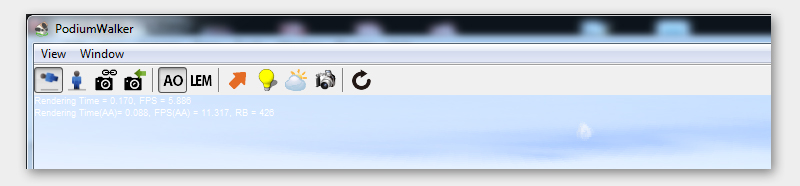
1. Walk mode/fly mode: The upper left of the Podium Walker window has the Walk Mode and Fly Mode navigation options.
Fly mode: A mode without considering gravity. There is no collision to any objects. View point height is ignored.
Walk mode: A mode that simulates walking on the ground. This considers gravity. This mode detects collision. You can You can Jump by using the space bar. The view point is always located at current SketchUp camera height except when using jump.
2. Connect SketchUp and Podium Walker camera: The two camera icons are used to synchronize Podium Walker’s camera with SketchUp’s.
Always Synchronize (left icon)- By pressing the “always synchronize” icon, Podium Walker’s camera will become linked to the camera in your SketchUp scene, and vise versa. This is a two-way link, meaning if you move the camera in SketchUp, those changes will carry over to Podium Walker; likewise if you move the camera in Podium Walker, those changes will be reflected in your SketchUp scene.
Snap to SketchUp Camera (right icon) – Pressing the second camera icon will synchronize your Podium Walker camera with SketchUp’s, however this is not a two-way link, and does not affect your SketchUp camera. It simply updates the Podium Walker viewport to mirror the current SketchUp camera.
3. Ambient Occlusion - On/Off - The AO icon is used to toggle ambient occlusion on and off, to add subtle contact shadows to your scene. This is on by default.
Ambient Occlusion - Podium Walker is a ray tracing rendering program. With the addition of Ambient Occlusion, PW can calculate light reflecting from surfaces not directly exposed to the light source. In other words, AO is indirect light. It is an approximation to full global illumination so it will not have the quality level of still images that SU Podium V2 can create, but the AO makes a significant quality difference when rendering interior walk-through animations.
The following comparison shows the increased clarity and definition gained through the use of Ambient Occlusion. Not the increased clarity and definition around windows and in tight corners:
When AO is on, the raytracing speed decreases—in most cases the speed hit is worth it for the increased quality, however AO is not always needed especially with exterior renderings so PW includes an option to turn AO on or off.
4. Light emitting material (LEM) support: SU Podium V2 LEM lighting is supported in PW, however LEM lighting is very time consuming to calculate. The larger your LEM materials, the longer Podium Walker will take to calculate it. As a default LEM is turned off.
SU Podium V2.x LEM is behind the camera in this snap shot taken from Podium Walker animation.
Turn LEM on if your SketchUp/Podium model contains LEM lighting. Please note, that the rendering time will take longer than with omni lights. If your camera is directly viewing the LEM material, the material will not appear illuminated as it does in a SU Podium image. But in the Podium Walker, the LEM material is emitting light.
Read more about SU Podium V2.x LEM lights here.

5. LightMap Toggle: LightMap toggle icon is only used after a LightMap is created. Please read below about LightMaps. LightMap is a Windows version only feature. There is no LightMap in the Mac version.
6. Presets Panel: The orange arrow button will launch Podium Walker’s preset menu. This dialog is where you will create camera views that you will combine to make an animation path. The preset panel is discussed in further detail in the section on creating animations
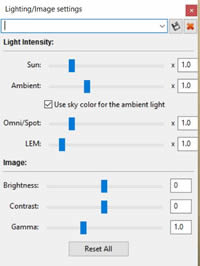
7. Light Settings - Light/Image setting UI gives you control over various global lighting and image settings.
The light intensity section is self explanatory; each slider will increase the intensity of each type of light source globally.
Lighting dialog allows for real time changes in Podium Walker’s natural light (sun and ambient) and omni or LEM light power within Podium Walker. You can always turn of LEM lighting support directly through the tool bar. These controls will not effect the SU Podium V2 properties that are in the SketchUp model.
Use Sky color for ambient light will change the ambient light to match the exterior sky color. It will produce realistic night and early morning renderings by using the color of the exterior sky for the ambient light.
The image setting include Brightness, Contrast and Gamma sliders.
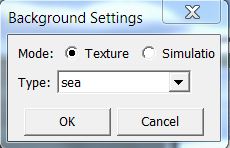
8. Background Settings - Opens the Background Settings dialog box.
This include a texture and simulation mode that creates various exterior backgrounds, and provides various types of sky and ground backgrounds.
9. Lightmaps - read here about how lightmaps work. (Windows only feature)
10. Snap Shot - Takes a “snap shot” of the Podium Walker scene, and saves a still image into the scene directory.
11. Reload - This icon causes Podium Walker to reload the SketchUp model. It’s useful if you have made some changes to the SketchUp model itself.

2. The Bottom Menu:
Time display: Time display shows the current day that the view is set to. Once you first open a SketchUp model, the time will be displayed to the same time to the SketchUp model. Also, if you import scenes from SketchUp and then change to each scene, the time displayed will match the time of the original SketchUp scene. When you use the time lapse feature, the time displayed will show your times they are updated.
Cam height: The default camera height if your camera is in Walk mode will be 70″. However, you can change the camera height by clicking on the Cam Height icon. This action will invoke a small dialog box that will allow you to change the dimensions in inches.
3. Navigation:
W/S keys will make camera make camera go forward/backward in the same plane.
A/D keys will make it go sideways in the same plane.
Holding space bar will move the camera up vertically in the Z direction
Shift +space key will make the camera go down in the Z direction.
Left mouse button will move the camera forward, backward and rotate in one plane.
Right mouse button will pivot the camera vertically and move the camera position forward, backward and in rotation.
Hold the CLT + right mouse button and move left or right and time will change. You can use REC to create a video of time/ shadow motion.