ProWalker GPU - V1.2.4 Update Release
ProWalker V1.2.4 now has Iray 5 integrated in it. As with previous versions ProWalker 1.2.4 supports Nvidia's RTX cores, making a still image rendering or an animation 50% to 300% faster, depending on the SketchUp model's complexity. ProWalker V1.2.4 is compatible to any version of SketchUp 2019 and 2020. This Materials and Surfaces export in 1.2.4 is considerably faster than previous version. This version fixes the "disappearing geometry" bug and the slow termination problem. And v1.2.1.1 for SketchUp 2017 and 2018 also include a much faster materials and surfaces export (the initial rendering process) Also, the premature sample termination bug is fixed. Find a full overview of new animation features beneath the download:
Note: ProWalker GPU 1.2.x and above use a different licensing system than the older ProWalker GPU (prior to July 15, 2019). You can exchange your PW license with a new license here.
Read about v1.2.4 which supports colored LEM and dynamic rotation of HDRI backgrounds here.
Overview of newer features in ProWalker GPU
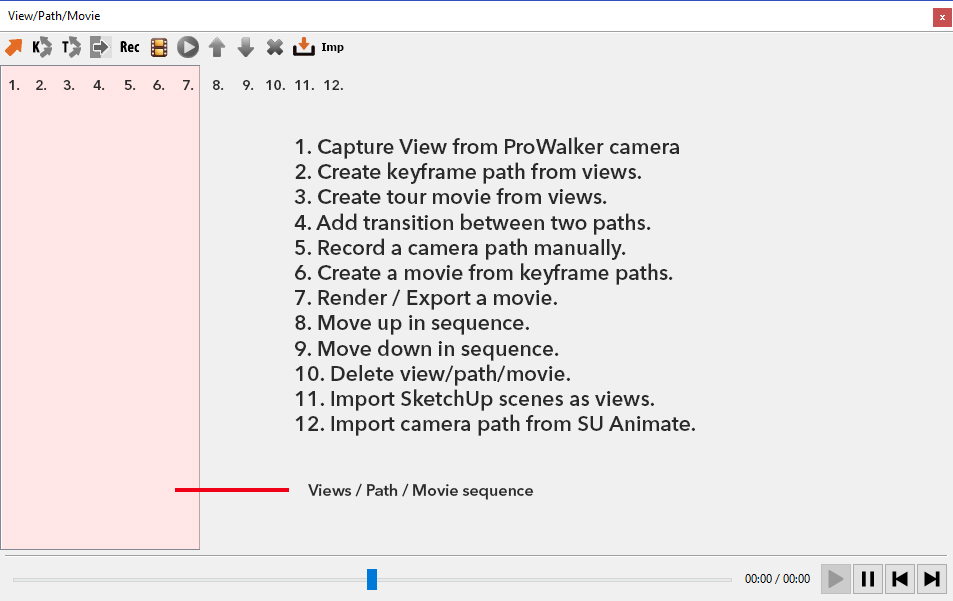
ProWalker's new interface for creating camera fly-through and time lapse animations is accessed from the View/Path/Movie panel.
In this dialog the user can import camera position from SketchUp scenes, capture keyframes, set-up camera paths for animation, add scene transitions, and render/export final movies.
Path/Animation functions:

Capture view from ProWalker - Clicking the arrow icon will capture the current camera view and position directly from the ProWalker viewport, and add a new View to the left column in the paths dialog. Each view can be used as a keyframe in a motion path and used to create keyframe tour animations. Shadow angle (date/time settings) are also saved in the view.

Create keyframe path from views - Shift + select two or more Views and click the keyframe icon to create a camera motion-path between the Views. The animation path created by ProWalker is exactly the same as the smooth animated transition you see in SketchUp when clicking between two different SketchUp Scenes.
- Add one or more paths to a "Movie" to render and export your animation. Read More.
- Path options - Click here to read about the settings and options within the paths interface.

Create tour movie - Select any number of Views from the column below, and click the tour icon to automatically create a point-to-point tour animation.
The Tour option creates a separate path for each camera movement. So if you select three views, two paths will be created:
- Path 1: From View 1 to View 2
- Path 2: From View 2 to View 3
This differs from the "keyframe path" button, which creates a single smooth motion path, even if 3 or more Views are selected (ie - View 1 to 2 to 3, in a single smooth motion). The Tour option lets you add a pause or transition between paths if desired.

Record camera path - Record camera movement directly from the ProWalker viewport. Click the Record button to start capturing the motion path, then use ProWalker's standard navigation functions to move, pan, orbit, or rotate the camera. Remember in addition to mouse-based navigation, you can use AWSD (Left, Forward, Backward, Right and Space bar on the keyboard for smooth camera motion. Press record again to end the recording.
Path speed: Paths created with the record function use the "Scaling" option to control camera speed. By default, scaling is set to 1x which plays at the same speed that the path was captured. Increase or decrease as needed.

Add a new Movie - Select any Path or Paths and click the filmstrip icon to create a Movie. Once a Movie is created, you can modify the sequence, change path settings, and add transitions from the Movie interface. Path settings determine quality, camera speed, and render mode, so please read here for a deeper explanation.
Note: Paths must be added "Movie" before you can render and export an animation.
Add transition between paths - After one or more Paths have been added to a Movie, you can insert fade-in, fade-out, or crossfade transitions into the sequence by selecting the Movie from the column below, and clicking the Add Transition button.
Note - The Transition button is only clickable if a "Movie" is selected in the scene hierarchy.
When a Transition is selected in the left column, the user can move it up or down in the movie sequence using the up/down icons. You may also change the speed and transition type in the Transitions UI:

Create Movie - Select a Movie from the left column, and click the Create Movie icon to begin the rendering / export process. Make sure to review the settings below before starting the render process:
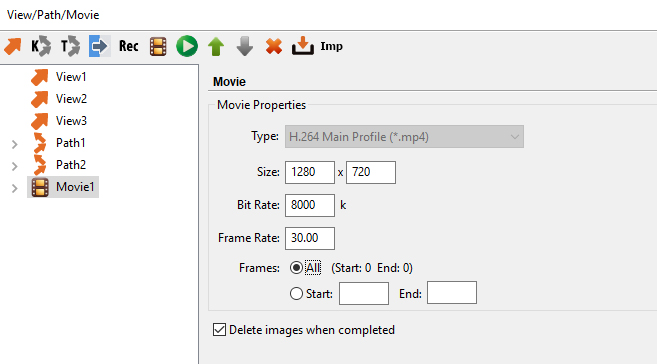
- Type - Select the video codec you would like to export
- Size - Pixel resolution of exported video
- Bit Rate - The amount of data encoded into the video per second. Default 8000kbps. Higher bit-rate yields larger file sizes, but adds less compression to the final video file. Leave as default unless you are familiar with encoding processes.
- Frame Rate - The number of frames rendered per second of video. Using a lower frame rate will shorten the total render time, however too low a frame rate will produce choppy video. Frames - By default, ProWalker will render All frames in the selected movie. Set a specific start and end frame to render a custom selection. (This is useful if you need to resume an interrupted render job, for example.) Delete images when completed - When this is checked, individual frames will be deleted from your hard drive once the final video file as been saved. Leave this unchecked if you want to keep the still frames as a backup.

Move item up - Move a view, path, or movie up in the animation hierarchy.

Move item down - Move any view, path, or movie down in the animation hierarchy.

Delete item - Delete any View, Path, or Movie from the animation hierarchy.

Import Scenes from SketchUp - This option imports SketchUp scenes as Views. Camera position, field of view, and date/shadow settings are imported with each scene.

Import from SU Animate - This button lets you import camera animation paths from SU Animate. Note, this only applies to camera animation; object animations from SU Animate cannot be rendered by ProWalker.
Path Options
Once a path has been created from two or more views, there are several important options that must be configured before exporting a movie. Select a path from the left column to access the Path options.

Pause Camera - Allows you to add a pause at the beginning or end of a path before the camera continues moving through subsequent scenes.
Date/Time - Check this option if you want ProWalker to use the date and time settings from each view. You can use this setting to create a time lapse/shadow animation by choosing a different time of day for each scene. For example: If Scene 1 is set to 8:00 AM, and Scene 2 is set to 12:00 PM, the final movie will illustrate the passage of four hours as the shadow position gradually changes from 8:00AM to 12:00 PM.
Speed - For regular keyframe paths the user can choose between duration and translation speed options. The third scaling option is only applicable for paths created with the Record function.
- Duration - Set the exact duration of a path in seconds. This is the easiest and most intuitive speed option; if you set the path duration to 3 seconds, it will take exactly 3 seconds for the camera to travel the length of that path (In this case, from Scene 1 to Scene 2.)
- Translation - The user may also set a camera speed in inches per second. Note, with this option you are choosing the speed of the camera, not the animation duration; the duration of the animation and number of frames required will depend on the distance the camera needs to travel.
- Scaling - This option is grayed out, except for paths that were captured directly from the ProWalker viewport using the "Record" function. Scaling is simply a speed multiplier — 2x plays the clip twice as fast while 0.5 plays at half speed (doubling the length of the clip).
Smooth camera speed at start/end

This is an easing function. When checked, ProWalker will ease-in or ease-out of camera movements at the beginning or end of a path.
What this means is that instead of going from 0 to full speed immediately, the camera starts slow and accelerates smoothly up to speed (or the opposite when slowing down at the end of a path.) The following image illustrates linear motion with and without easing:
Image by Stacy Straub.
This is a classic technique in both animation and live-action film making. Since motion in the real world cannot occur without acceleration/deceleration, turning this option on will generally lead to more natural/appealing camera movement at the beginning and end of a path.
Note—this function is helpful at the beginning and end of a movement, or where the camera is abruptly changing direction. It is less useful/necessary in instances where you plan to use a crossfade or jump-cut.
Render Settings
You can now set render mode, termination criteria, and denoise separately for each path in your animation. These controls are only visible once a path has been added to a movie; they will be grayed out and inaccessible if you select a camera path that isn't part of a movie hierarchy.
Render mode - Choose a render mode for the selected path. Remember, PR mode is the highest quality but significantly slower than the other options.Denoise - Choose whether the selected path will use the Iray denoising algorithm. As always, this decision is highly dependent on how much time you can allow for rendering., but more often than not this will be turned on for animation. Though the denoiser does produce some artifacts at lower sample counts, the considerable speed benefits are almost usually worth the trade-off.
Termination criteria
This parameter determines the amount of time or number of samples ProWalker will devote for each frame in your animation. You have two options:
-
Samples per frame - A common work flow is to determine the number of samples needed to produce a single frame at a quality level you are happy with and use that as the termination criteria for your animation. However this requires you to be very mindful of how long your animation is going to take to render. For example: if you know it takes your computer five minutes to render a single frame with 10,000 samples in PR mode, this extrapolates to 120 hours for a minute of animation — an awful long time.
So instead, you could render 200 samples per frame in ID mode, with the Denoiser turned on. You might lose a bit of subtlety, but if your animation looks 90% as good in 10% of the time, the trade-off is probably acceptable.
Time (seconds) per frame: If you have a firm, unalterable deadline, you are better off using the Time option as your termination criteria. If you know you have exactly 10 hours to render a 1500 frame animation, it's simple math. Ten hours is 36000 seconds; divide 36,000 by 1500 frames, and you have your answer: You would set your termination criteria to 24 seconds per frame.
TUTORIAL: Create a short time lapse animation
This 12 minute video serves as an introduction to the new Paths / Animation interface, and walks through the creation of a very simple time lapse animation using the new date/time keyframe features.
FOLLOW ALONG
This kitchen scene can be downloaded from the sample models page.
Note - The Studio Kitchen model is quite heavy and may render slowly on older graphics cards. Use the Barcelona Pavilion or Interior Quick Start models for faster render speeds.