Installation and Activation Guide


  Download Podium Walker

If you haven’t already done so, please head over to the Podium Walker download page to download the latest version of the software.

Podium Walker will work on both Windows and Mac, and is compatible with SketchUp 2015, 2014, 2013 as well as SketchUp 8.


  Installation Instructions:


1. Windows Installation for SketchUp 8, 2013, 2014 and 2015.

The Podium Walker Windows install is an .rbz installation file, which can be downloaded as either a standalone or zipped .rbz file from the download page. You may download the .rbz file to any folder on your computer.

Note: Internet Explorer 8 may automatically unpack .rbz files so we recommend you use IE 9 or higher, FireFox or Chrome to download .rbz files.


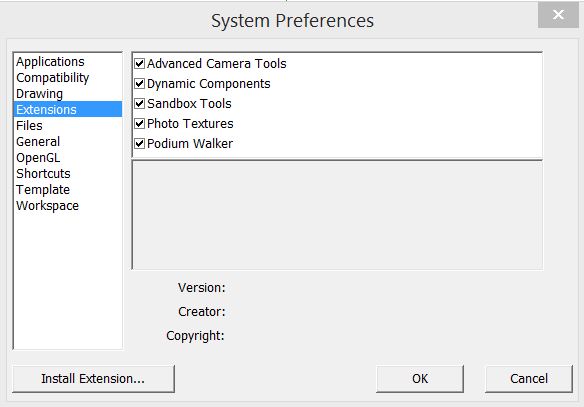
2. Launch the SketchUp Preferences Menu: (Window    Preferences)


3. Installing the RBZ File: (Extensions    Install Extension)

  • About RBZ – SketchUp .rbz files are installation files that install extensions (plug-ins) from within SketchUp 8, 2013,2014 and 2015. You must install the Windows version of Podium Walker from within SketchUp’s Window menu, Preferences/ Extension dialog box.

Do not attempt to install the Podium Walker .rbz file from outside of SketchUp.


4. Browse to the .RBZ file and Click Open/OK

Remember, the Windows .rbz file will only work with the Windows versions of SketchUp.

Do not use the Podium Walker .rbz Windows version on a Mac, and vise versa.


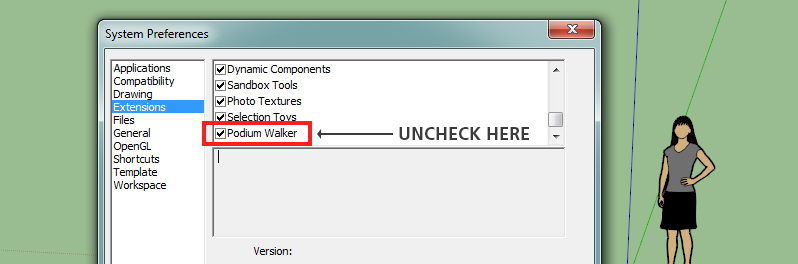
  To remove Podium Walker from your PC

The easiest way to uninstall an .rbz file is to simply uncheck the the Podium Walker extension in SketchUp’s Preference/ Extensions interface:

uninstall-windows


You can also remove the entire PodiumWalker folder and the load PodiumWalker.rbs file from the following location:

c:\program files (x86)\sketchup\sketchup (8 or 2013)\plugins\

For SketchUp 2014/ 2015, Podium Walker is installed here:

C:\Users\YourComputerName\AppData\Roaming\SketchUp\SketchUp 201x\SketchUp\Plugins\

Remove the PodiumWalker folder and the loadPodiumWalker.rbs file


1. Mac OS-X Install:

Podium Walker for Mac uses an .rbz installation file, which can be downloaded in zipped or unzipped format from the PW downloads page. Podium Walker will install without any issues for Maverick, Mountain Lion and Lion, and will work in SketchUp 8, SketchUp 2013, SketchUp 2014 and SketchUp 2015.  Safari may automatically unpack .rbz files so it’s recommended you use FireFox or Chrome to download SketchUp extensions.

Note: Podium Walker will only work on Maverick or Yosemite.

Downlaod the .rbz file to a folder of your choice.


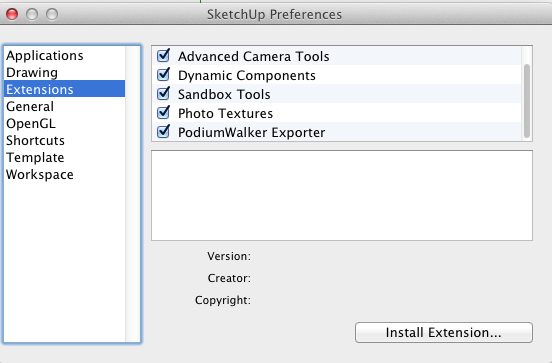
2. Launch the SketchUp Preferences Menu: (SketchUp/    Preferences)


3. Installing the RBZ File: (Extensions    Install Extension)

  • About RBZ – SketchUp .rbz files are installation files that install extensions (plug-ins) from within SketchUp 8, 2013, 2014 and 2015. You must install the Mac version of Podium Walker from within SketchUp Preferences Extension dialog box.
×

Do not attempt to install the .rbz file from outside of SketchUp.


4. Browse to the .RBZ file and Click Open/OK

Remember, the Mac .rbz file will only work with the Mac versions of SketchUp.

Do not use the Podium Walker Mac .rbz file on a Windows Machine, and vise versa.


  Mac Specific Issues: Read – Write Privileges


If your Mac does not have read and write privileges on the SketchUp plugins folder, SketchUp will be unable to install the Extension.

  • SketchUp 2014/ 2015: In Finder go to User\Library\Application Support\SketchUp 2014\SketchUp\Plugins\ folder, right click Get Info and make sure that your account has Read & Write privilege.
  • SketchUp 8: In finder go to \Macintosh HD\\Library\Application Support\SketchUp 8\SketchUp\Plugins\right click Get Info and make sure that your account has Read & Write privilege.

  To remove Podium Walker from your Mac

SketchUp 2014 Users: Although SketchUp 8 and SketchUp 2013/2014/ 2015 all use the same .rbz installation file, the location where the Podium Walker plug-in gets installed is different. If you want to remove Podium Walker, you will need to be aware where Podium Walker is installed.

  • To remove Podium Walker from SketchUp 8 for Mac:
  1. Go to your Application folder and navigate to the \User (your computer name)Library\Application Support\Google SketchUp X\SketchUp\Plugins\ folder.
  2. Remove the loadPodiumWalker.rbs file and the PodiumWalker folder.
  3. The Macintosh HD folder is often referred to as the Global directory. It will be listed as one of your devices in Finder. If it is not listed in Finder, go to Finder Preferences, Sidebar and check Hard disks under Devices. You may need to go to the General icon in Finder Preferences and make sure Macintosh HD is listed in New Finder windows show:
  • To remove Podium Walker from SketchUp 2013/2014/ 2015 for Mac:
  1. Go to your \user (user name)\Library\Application Support\SketchUp 201x\SketchUp\Plugins\ folder.
  2. Remove both PodiumWalker.rbs and the PodiumWalker folder.
  3. The user folder is the Home folder. It will be listed as one of your favorites in Finder If it is not listed in Finder, go to Finder Preferences, Sidebar and check the Home icon.


Activate the Podium Walker License

All Users:

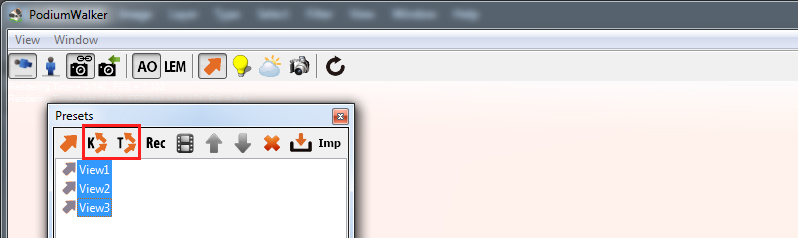
      Activate your Podium Walker license using the Podium Walker pull down menu in the SketchUp Plugins menu. Enter the sixteen alpha numeric license code that you received.


Podium V2 and Podium Browser Integration

Podium Walker integrates nicely with both SU Podium V2 and Podium Browser, however here are a few things to keep in mind.

If you’re curious about Browser and SU Podium integration, our Pavilion test scene is available to download, and includes both Podium Browser components and various Podium V2 properties.  This model has a light fixture, 3D tree, glass material, blurred reflections, direct reflections and furnishing from Podium Browser.

1. Supported V2 Lights and Material Properties

Podium Walker supports most light and material properties in V2 and V2+, including the following:

  • SU Podium V2 – Reflections and blurred reflections
  • SU Podium V2 – Refractions
  • SU Podium V2 – Bumps
  • SU Podium V2 – Omni lights
  • SU Podium V2 – Spot lights
  • SU Podium V2 – LEM materials (light emitting materials)
×

Note: LEM materials are processor intensive and can lead to substantially longer render times. These are best used with a relatively high-spec workstation.


2. Video Series: Design and Visualize with Podium Walker & Browser

In this four part video series, we first design a model primarily with render-ready components from Podium Browser, and then visualize the design with both SU Podium V2 and Podium Walker. Material covering Podium Walker begins with Video 3, so if you’re already comfortable with Podium Browser and SU Podium, feel free to skip ahead.


Click on the image to link to the Podium Browser with Podium Walker Video series page


Exporting Video Files

So you’ve set your keyframes, created an animation path, previewed it in the viewport to make sure you like the result.  To create a usable animation that can be shared, posted online, etc., we need to export a video file from Podium Walker.

export


1. Select the animation path you’d like to export:

In order to export a video file from Podium Walker, you must open the Preset Menu (orange arrow in the main menu), and select the animation path you’d like to save out.

exportWith a path selected, the export icon (which was previously grayed out) will now be available to you.  Click the filmstrip icon to launch the “Movie Settings Dialog.”


moviesettings


Camera Speed: With the camera speed multiplier you have one final chance to increase or decrease the movie’s camera speed in relation to the speed of your animation path.

Preview –  Preview is off by default. If it is on, you will be able to create a movie in less time but it will not be a photo-realistic movie. Preview’s only intention is for you to create a non-photo-realistic movie so you can see if the animation’s path is what you want.

Resolution, frame rate, and other considerations:

This will require you to know something about the Bit Rate and Frame Rate of the particular Codec you choose. Please note that some Codecs require a particular video viewer.

  • Resolution: This is the final pixel resolution of your video.  The large the resolution, the longer it will take Podium Walker to render out your video. Consider lowering your resolution to 640 X 480 or less to initially to test what your video will look like.
  • Frame Rate: Frame Rate is the number of frames per second that Podium Walker will render. Consider lowering your frame rate to 10 or 15 initially. Frame rate over 30 is unnecessary in most cases.
  • Your computer’s system memory: System memory or RAM will not change the video output speed. But if you want to have high resolution and relative long video animations, you should have as much memory as you can.

2. Choose an export format:

Once you create an animation with Podium Walker and like the way it looks, you will want to export or output the animation to a video (movie) format.  We typically recommend common web-friendly file-types such as .mp4 or .mov (for Mac users), however lossless options like .avi are available to you as well.


3. Ready to export:

Remember, the most time consuming part of creating a Podium Walker animation is the exporting or outputting to a video format. At a resolution size 1920 X 1080 and a Frame Rate of 30, a thirty second video may take several hours or more. The speed and number of cores of your CPU is the most important determining factor in render speed.

When you’re ready to export, click OK in the “Movie Settings” dialog, and Podium Walker will begin rendering out your video.


4. View and share your video:

To view the movie you create, you will need a media player.  Both Windows and Mac come with bundled media players: Windows 7 provides a free video player called Live Movie Maker but some people have reported that it is not compatible with certain video formats, and Apple provides users with QuickTime.

Note: If you choose a codec like .AVI you may need to experiment with video players to make sure the movie format you export to can be played. VLC is a recommended, lightweight player with a wide range of codec support.

If you need to experiment with media players, here is a list of free, recommended options:


5. Video Editors:

It’s likely that you will need a video editor to add audio and other effects to your Podium Walker animations. In fact, in many cases, it will be wise to create several paths and equivalent number of videos and stitch these together in a video editor. This is something to consider if you lack the RAM to create a long video. With multiple paths, you can have different camera speeds for each path and corresponding video and you can combine these videos together effectively.

Some well known video editors are Adobe’s Premier, Tech Smith’s Camtasia, Pinnacle Studio, even iMovie and Windows MovieMaker.


Animation in PW

There are three ways to create an animation in Podium Walker: Keyframe animation, Tour animation, and by simply recording your camera movements in real-time.  Lets go through the process:


1. Launch the Preset Panel

Click the orange arrow to launch the preset panel.  This dialog is where we will do most of our animating in Podium Walker, including setting keyframes and recording camera movements.

preset-menu


2. Setting Keyframes Manually

Keyframes are an accurate and easy way to create animations in Podium Walker.  Using the preset panel, you can create a series of views or “keyframes.”  Each separate view will be treated as a key frame in the animation, and Podium Walker will automatically interpolate the camera path connecting them. If your SketchUp model already has multiple SketchUp scenes, these scenes can be imported as key frames (more on this later).

To create a keyframe, move your Podium Walker camera to the view you want to use, and press the orange arrow button in the Preset panel. A window will pop up asking whether you’d like to rename the preset–rename it if you wish, and then press OK.  Your camera view will be added to the list as “View1″.  Repeat this as many times as necessary.  The order of your views can be arranged in the preset panel using the up and down arrows.


3. Creating an animation path from your keyframes:

Once you’ve finished setting keyframes, you’ll need to convert them to an animation path.  To do this, shift + select all the keyframes you want to include in your animation.

presetsWhen you’ve selected more than one keyframe, you’ll notice that the K and T icons in the preset panel will now be available to you (these are grayed out by default).  Pressing either of these icons will convert your keyframes into an animation path.

Two Options – K and T – The primary difference between the two path options is in the way that Podium Walker treats each keyframe in your animation path.

  • K (Keyframe animation) – If you press the K icon, Podium Walker will create an animation path from keyframe to keyframe, interpolating between each position as smoothly as possible.  This yields a very nice fly-through effect that can work very well as an end product.
  • T (Tour animation) – Tour animations work almost the same way.  Podium Walker still automatically interpolates the camera path between keyframes, the only real difference is that Podium Walker will pause on each view for a designated period of time.  This can be set manually (an option dialog will pop up when you press the T icon).

When you press either or the K or T path icons, a dialog will appear, where you can name the animation path and set the camera speed.  Podium Walker’s default camera speed is 100 inches/sec, but PW will automatically display the last speed that you used.  Faster camera speeds will yield a shorter animation (and fewer overall frames), so if you’re in a hurry to export video, increasing the camera speed can be a good way to do so.


When you’re finished click OK and your animation path will appear in the preset window.  You can double click the path the play through it in the Podium Walker viewport.


Recording The Screen:

recIf you start the Rec operation, Podium Walker will create an animation path from your mouse camera movement. Click on Rec when you are finished recording the screen. This method is particularly very useful if you are creating static time-lapse animations (see below).


Creating a time-lapse animation:

A time-lapse with moving sun/shadows can be created using the Record feature, discussed above.  Turn REC on, and use Ctrl + Right Mouse drag to change the position of the sun and shadows.  This effect is shown in the following video:


4. Importing keyframes from SketchUp or SU Animate

Importing scenes from Sketchup – If you have already created a number of separate camera views (scenes) in SketchUp, and wish to use these scenes as the keyframes in your animation, use the Import SketchUp Scenes icon (downward orange arrow) in the Preset panel. This will import all your Sketchup scenes and convert this to PodiumWalker views.

Note: only the camera position of each SketchUp scene will be imported. The sun position and hidden geometry on hidden layers will not be imported.

importing-SUAnimateImporting from SUAnimate – Podium Walker provides a quick way of importing SU Animate V4’s camera path’s or key frames into Podium Walker. After you have previewed the camera animation in SU Animate’s preview, Export the Camera Path. This will not work unless you have a camera animation. Export the Camera Path menu in SU Animate will create a CSV file. Import the model into Podium Walker using the Imp icon from the Preset Panel. Once the model is imported, go to Presets and IMP (import) the SU Animate CSV file. You will then see a Path in the Preset panel.


Menus & Navigation

1. The top menu:

Podium Walker has a relatively simple interface (pictured below).  Let’s go through the functions one by one:


Walk Mode/Fly Mode: The upper left of the Podium Walker window has the Walk Mode and Fly Mode navigation options.

  • Fly Mode – A mode without considering gravity.
    There is no collision to any objects. View point height is ignored.
  • Walk Mode – A mode that simulates walking on the ground.  This considers gravity. This mode detects collision. You can You can Jump by using the space bar. The view point is always located at current SketchUp camera height except when using jump.

Connect SketchUp and Podium Walker camera:   constrain-cameraThe two camera icons are used to synchronize Podium Walker’s camera with SketchUp’s.

  • Always Synchronize (left icon) – By pressing the “always synchronize” icon, Podium Walker’s camera will become linked to the camera in your SketchUp scene, and vise versa. This is a two-way link, meaning if you move the camera in SketchUp, those changes will carry over to Podium Walker; likewise if you move the camera in Podium Walker, those changes will be reflected in your SketchUp scene.
  • Snap to SketchUp Camera (right icon) – Pressing the second camera icon will synchronize your Podium Walker camera with SketchUp’s, however this is not a two-way link, and does not affect your SketchUp camera.  It simply updates the Podium Walker viewport to mirror the current SketchUp camera.

ambient-occlusionAmbient Occlusion – On/Off – The AO icon is used to toggle ambient occlusion on and off, to add subtle contact shadows to your scene.  This is on by default.

  • Podium Walker is a ray tracing rendering program. With the addition of Ambient Occlusion, PW can calculate light reflecting from surfaces not directly exposed to the light source. In other words, AO is indirect light. It is an approximation to full global illumination so it will not have the quality level of still images that SU Podium V2 can create, but the AO makes a significant quality difference when rendering interior walk-through animations.

The following comparison shows the increased clarity and definition gained through the use of Ambient Occlusion.  Not the increased clarity and definition around windows and in tight corners:


amb-occ-comparison


When AO is on, the raytracing speed decreasesin most cases the speed hit is worth it for the increased quality, however AO is not always needed especially with exterior renderings so PW includes an option to turn AO on or off.


light-emitting-materialsLight Emitting Material (LEM) Support – SU Podium V2 LEM lighting is supported in PW, however LEM lighting is very time consuming to calculate.  The larger your LEM materials, the longer Podium Walker will take to calculate it. As a default LEM is turned off.


lem-example

SU Podium V2 LEM is behind the camera in this snap shot taken from Podium Walker animation.


Turn LEM on if your SketchUp/Podium model contains LEM lighting. Please note, that the rendering time will take longer than with omni lights. If your camera is directly viewing the LEM material, the material will not appear illuminated as it does in a SU Podium V2 image. But in the Podium Walker, the LEM material is emitting light.

Read more about SU Podium V2 LEM lights here.


Presets Panel – presets-panelThe orange arrow button will launch Podium Walker’s preset menu. This dialog is where you will create camera views that you will combine to make an animation path. The preset panel is discussed in further detail in the section on creating animations (LINK).


Light Settings – Light/Image setting UI gives you control over various global lighting and image settings.

The light intensity section is self explanatory; each slider will increase the intensity of each type of light source globally.

Lighting dialog allows for real time changes in Podium Walker’s natural light (sun and ambient) and omni or LEM light power within Podium Walker. You can always turn of LEM lighting support directly through the tool bar. These controls will not effect the SU Podium V2 properties that are in the SketchUp model.

The image setting include Brightness, Contrast and Gamma sliders.


BUntitled-4
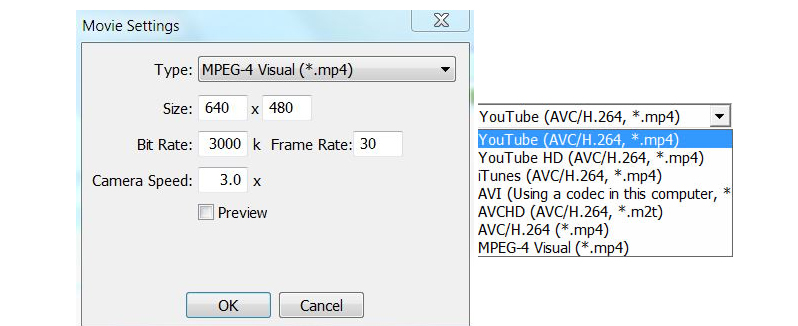
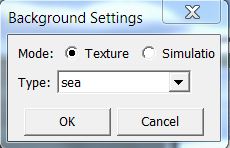
ackground Settings – Opens the Background Settings dialog box.

This include a texture and simulation mode that creates various exterior backgrounds, and provides various types of sky and ground backgrounds.


snapshotSnap Shot – Takes a “snap shot” of the Podium Walker scene, and saves a still image into the scene directory.


reloadReload – This icon causes Podium Walker to reload the SketchUp model. It’s useful if you have made some changes to the SketchUp model itself.


2. The Bottom Menu:

Time display – Time display shows the current day that the view is set to. Once you first open a SketchUp model, the time will be displayed to the same time to the SketchUp model. Also, if you import scenes from SketchUp and then change to each scene, the time displayed will match the time of the original SketchUp scene. When you use the time lapse feature, the time displayed will show your times they are updated.

Cam Height – The default camera height if your camera is in Walk mode will be 70″. However, you can change the camera height by clicking on the Cam Height icon. This action will invoke a small dialog box that will allow you to change the dimensions in inches.


3. Navigation:

As a default the PW camera is disconnected from the SketchUp camera. PW camera has different navigation controls to SketchUp’s mouse.

If you click on the Podium Walker window the mouse and keyboard control of your Podium Walker camera will change. The below description is how the mouse and keyboard controls the Podium Walker camera.

  • W/S keys will make camera make camera go forward/backward in the same plane.
  • A/D keys will make it go sideways in the same plane.
  • Holding space bar will move the camera up vertically in the Z direction
  • Shift +space key will make the camera go down in the Z direction.
  • Left mouse button will move the camera forward, backward and rotate in one plane.
  • Right mouse button will pivot the camera vertically and move the camera position forward, backward and in rotation.
  • Hold the CLT + right mouse button and move left or right and time will change. You can use REC to create a video of time/ shadow motion.

Getting Started with PW

Getting started with Podium Walker is easy.  In this six part guide, we’ll take our first look into Podium Walker, explore the interface and navigation, and explain how to create and export an animated video.  This guide assumes you already have Podium Walker installedif you’re having trouble doing so, please consult our installation guide.


1. After installing Podium Walker, open SketchUp.

Podium Walker works best on SketchUp models that have some SU Podium V2 materials or lights included. To examine Podium Walker functions, load a SketchUp model with Podium properties or download this Barcelona model from here.

Note: This model has Podium V2 reflections applied to the water.

Podium Walker can be accessed from the SketchUp plug-ins menu or from a single icon tool bar.


2. Click the Podium Walker icon to launch the PW interface.

Your current SketchUp model will get loaded (exported) into a Podium Walker window and rendered very quickly. If your SketchUp scene covers the entire viewport, it’s possible that the Podium Walker window will be behind the SketchUp window.

Your viewport should look like this image below with the SketchUp window and the Podium Walker window:


With the Barcelona model, you can see how Podium Walker quickly converts the SketchUp model and renders it using ray tracing. The Podium V2 materials properties and artificial lights are rendered as well.

NOTE: Podium Walker is not meant for still image rendering. SU Podium V2 is a much higher quality ray tracing and global illumination program. However, with Podium Walker you can navigate inside the Podium Walker window and experience real time ray tracing. It can be used a “viewer” for SU Podium V2.


4. Things to note:

  • Podium Walker also reads the time of day from SketchUp and provides natural sun and sky light. The sky environment provided by Podium Walker will change with the time of day and or position of your camera.
  • You can re-size the Podium Window dynamically.
  • Changing geometry in SketchUp or adding SU Podium V2 properties does require that you to close and reopen the Podium Walker window or use the  button from the top icon menu.
  • As a default, PW camera is disconnected to SketchUp camera. The mouse controls in PW are different from SketchUp’s. Please read the navigation section below. However, you can connect the PW camera to the SketchUp camera to obtain the familiar SketchUp navigation controls. Please read below.